David
E. Baker and Don Day
University
of Missouri Extension
| Table 1. Selecting a Chain
Saw. |
| Type
| Guide bar length
| Use |
| Mini or lightweight saws |
8
to 12 inches |
Light and occasional use for limbing, cutting
small logs and felling very small trees. |
| Midweight saws |
14
to 20 inches |
Frequent log cutting and felling of small
trees. |
| Heavyweight saws |
Over 20 inches |
Professional use, not generally recommended for
consumers. | Although once used
only by professional lumberjacks, chain saws are now popular
among many homeowners and farmers. Homeowners use them to cut
firewood and to do general tree trimming around their homes.
Farmers find them very useful for such jobs as clearing land,
trimming trees and cutting firewood.
However,
in the hands of a careless or inexperienced operator, chain
saws can be very hazardous. The U.S. Consumer Product Safety
Commission estimates that in 1979 approximately 50,000 people
required hospital treatment for injuries associated with chain
saws. Most accidents were caused by the operator coming into
contact with a moving chain saw blade. Injuries from a chain
saw are usually serious because they leave a jagged cut.
SHOPPING
FOR A SAW
The first step to
safely operating a chain saw is selecting a saw that fits your
needs and is quiet, balanced and equipped with safety
features.
First,
you must decide whether a gasoline or electric chain saw is
best for you. Consider the following points when selecting a
saw.
Electric-powered saws (Should be listed by the
Underwriters' Laboratories (UL)):
- Require a nearby, convenient source of electricity.
- Need
no fuel.
- Run
quietly.
- Start
easily and instantly.
- Are
limited in guide bar length (usually under 14 inches).
- Can be
used indoors.
- Have
potential for shock hazard.
- Usually cost less.
- Vibrate less.
- Have
no exhaust fumes.
Gasoline-powered saws:
- Can be
used anywhere; not limited by electric cord.
- Use
gasoline-oil mixture as fuel.
- Are
relatively noisy and smokey.
- Require some effort to start.
- Available in many engine and guide-bar sizes.
- Intended for outdoor use.
- Have
potential for fire or burn hazard.
Second,
consider the length of the guide bar. Match the bar size to
the type of job you expect to do most often.
Mini or
lightweight saws have 8- to 12-inch guide bars; they are for
light and occasional use for limbing, cutting small logs and
felling very small trees.
Midweight
saws have 14- to 20-inch guide bars; they can be used for
frequent log cutting and felling of small trees.
Heavyweight saws have guide bars that are more than 20
inches long. These saws are not generally recommended for
non-professional saw owners.
If the
guide bar is substantially longer than the thickness of the
wood to be cut, accidental contact between the guide bar tip
and a branch, the ground or other object could result in a
serious kickback injury.
If the
guide bar is too short, you will have to bury the tip of the
guide bar in the cut. Although most manufacturers indicate
that a saw can cut a log twice as thick as the guide bar,
burying the tip of the guide bar in the wood could also result
in a serious kickback injury.
YOU AND
YOUR SAW
First, in
preparing to operate the saw safely, read and study the
operator's manual. Even if you are an experienced operator,
you should periodically review safe operational procedures. If
you buy a used saw, ask the previous owner for the operator's
manual or write the saw manufacturer for a copy.
Before
you cut firewood or timber, outfit yourself with the proper
clothing and personal protective equipment that will help
reduce the possibility of a serious injury. Use the following
list as a guide.
- Clothing should be well-fitted and free of
dangling or ragged edges that could become tangled in the
saw. For additional protection, use nylon mesh protective
leg chaps and/or knee pads to provide increased protection
to your legs.
- A
hard hat protects your head from falling limbs or
branches. A properly fitted hat is cool, comfortable and
provides important protection from serious head injury.
- Safety goggles or safety eye glasses with
side shields prevent injury from flying wood chips, twigs
and sawdust.
- A good
pair of comfortable ear muffs or ear plugs protect
your ears from continual exposure to the 95 plus decibel
noise level from the saw.
- A good
pair of light-weight leather gloves protect your
hands from abrasions, splinters and cuts.
- A pair
of safety boots or shoes with high tops will help
protect your ankles in the event of accidental contact with
the moving saw blade. Steel toes will help protect your feet
from injury from falling limbs or logs.
PREPARE
THE SAW
A saw in good
condition is safer and easier to operate. Preventive
maintenance will allow you to cut more wood quickly and
safely. Maintenance includes sharp teeth, correct chain
tension, proper lubrication and a properly tuned engine. Check
your operator's manual for this maintenance information.
A
properly sharpened chain. If you notice that the chain
tends to walk sideways while cutting or the cut shows fine
powder instead of chips, or if you find yourself pressing down
hard to keep cutting or smell burnt wood, your saw needs
sharpening.
Follow
the instructions outlined in your owner's manual when
sharpening the chain. If you do your own sharpening, use the
proper tools. Wear gloves or use a rag over the chain to
protect your hands from the sharpened cutters.
Correct chain tension. To assure good cutting
action and a long chain life, check chain tension. If too
loose, a chain will derail; if too tight, a chain will bind.
All
chains stretch with use. Most of the stretch occurs during the
first half hour of operation. Follow the manufacturer's
recommendation on chain tension. Most manufacturers recommend
that a cold chain be tightened to where the chain tie straps
hang away from the bar rail about 1/32 of an inch at the
center of the bar. A warm chain should be adjusted to a
1/8-inch gap.
Proper
lubrication. Lubrication will prolong a chain's useful
life. On saws with automatic oilers, be sure the oiler is
properly adjusted so it doesn't over-oil and run dry during
operation. Remember that automatic oilers need an extra squirt
of oil occasionally.
Occasionally the bar-oiling mechanism plugs up;
serious damage to the saw can result if this is not corrected.
If the chain smokes while operating, there is not enough
lubrication. To check for bar oiling, hold the saw tip above a
light colored, dry surface and accelerate the engine. Oil
should spatter on the surface if the oiler is operating
properly. If not, remove the guide bar and check the chain oil
discharge slot.
Tool
kit. Every owner should have a good tool kit to help
ensure continued operation of the saw. The kit should contain
the following:
- A few
extra labeled cans or a plastic bottle (with attached
pouring nozzle) of chain oil.
- Wrenches to fit all nuts and lugs on the saw.
- Screwdriver.
- Round
file and guide for touching up the chain.
- Flat
file and depth gauge to file the depth guides.
- Small
brush (1/2 inch) to clean away sawdust and wood chips from
around gas cap and cooling fins.
- Extra
spark plug.
- Owner's manual (wrapped in a plastic bag).
- Cleaning rags.
- Sharp
ax.
- Sledge
hammer and wedges.
- Multi-purpose fire extinguisher.
- Shovel.
- Supply
of fuel in a UL-listed and/or FM-approved safety can.
- First
aid kit.
OPERATING
TECHNIQUES
Refueling and
starting the engine. Since the chain saw engine is a
two-cycle engine, use the manufacturer's recommended fuel
mixture. When refueling the engine, use a funnel or flexible
nozzle to avoid spillage on the engine.
Only
refuel the engine when it is cool.
If fuel
is spilled, thoroughly clean the engine with the saw on the
ground and in an area cleared of combustible materials.
Do
not smoke during refueling.
Each time
you refuel, check the refill oiler, air filter, chain tension
and the tightness of all nuts, bolts and screws.
Starting the engine. With one foot placed in
the bracket to the rear of the unit, start the saw engine on
level ground. Set the starting controls. Grip the top handle
of the saw firmly with one hand; use your other hand to pull
the starting rope. Smaller saws may not have a foot bracket,
so make certain the saw is held firmly on the ground. Never
drop start the saw.
Felling procedures. Before you attempt to fell
any tree, consider its characteristics. One tree may lean, and
another tree might be unbalanced because of uneven top growth
or breakage even though the trunk doesn't lean. Large diameter
branches are also a good indicator of imbalance. Also consider
wind conditions, which can have a dramatic effect on the
direction of fall.
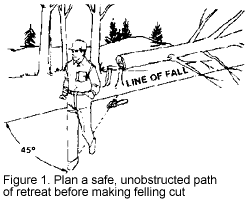 Clear the ground. Before you
start to cut, clear the ground around the base of the tree of
low or dead limbs, underbrush and other obstructions. This
precaution should provide clear vision, unrestricted movement
and an unhampered escape route when the tree begins to fall
(Figure 1). Clear the ground. Before you
start to cut, clear the ground around the base of the tree of
low or dead limbs, underbrush and other obstructions. This
precaution should provide clear vision, unrestricted movement
and an unhampered escape route when the tree begins to fall
(Figure 1).
A
felling and safety plan. In advance, plan your escape
route to either the rear or side, depending on the likely
direction of the fall. When the tree starts to go, shut the
saw off and drop it in a place that will allow an unhampered
escape.
When you
have determined a felling and safety plan, proceed as follows:
- Hold
saw firmly with both hands.
- Make a
cut close to base of the tree but high enough to
conveniently avoid running saw into the ground.
- Cut
through trees up to 8 inches thick with one cut.
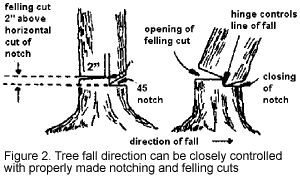
- On
larger trees, notch (undercut) at least one-third of trunk
diameter on fall side of trunk. Make lower cut of the
45-degree notch first to prevent pinching or binding of the
chain by wedge.
- Make
felling or back cut on the opposite side of the trunk 2
inches above and parallel to the horizontal notch. Leave
wood fibers to act as a hinge to keep tree from twisting and
falling in the wrong direction or kicking back on the stump.
(See Figure 2).
- Keep
the guide bar in the middle of the cut (horizontal) so
cutters returning in the top groove do not re-cut. Guide saw
into tree. Do not force it. Rate of feed will depend on the
size and type of timber being cut.
- Remove
saw from cut and shut off before the tree falls.
- Cutting completely through hinge fibers may allow
tree to fall in any direction, possibly on the retreating
operator. Move away from the tree at a 45-degree angle
through the cleared retreat lane.
Wedges. A well-balanced tree may have to be
wedged, pulled or pushed to fall in a desired direction.
Wedges are the most dependable means of controlling the
direction a tree will fall.
Use two
wedges rather than one to insure that the tree falls forward.
Use a sledge or mallet with a face at least 1/3 larger than
the breadth of the wedge. Strike squarely with firm, but not
excessive, blows. Careless blows may pop the wedge out,
swinging the tree backward. Using an ax head as a wedge or
driver is dangerous. The steel is likely to splinter, and
flying particles might strike the user.
 LIMBING
After the
tree is on the ground, take a look at each limb before making
the cut to be sure that cutting the limb off will not bind the
guide bar or cause the trunk to roll toward the operator.
Do not
face the limb squarely. Stand at a 45-degree angle so that if
the saw slips or completes the cut sooner than expected, the
chain will not strike your leg.
Sawing
with the point of the guide bar (nose sawing) greatly
increases the chances of chain saw kickback (Figure 3). If the
chain suddenly hits a solid object or takes too large of a
cut, then the saw may be forced backward. This could result in
a serious accident.
Preventing kickback. Follow these steps to prevent
kickback:
- Hold
the saw firmly with both hands.
- Grip
the top handle by putting your thumb around it.
- Use a
saw equipped with a chain-brake or kickback guard.
- Watch
for twigs that can snag the chain.
- Don't
pinch the bar while cutting the log.
- Saw
with the lower part of the bar close to the bumper, not on
the top near the nose.
- Maintain high saw speed when entering or leaving a
cut in the wood.
- Keep
the chain sharp.
- Don't
reach above shoulder height to cut. The chain is too close
to your face in this position.
Never make cuts
with the saw between your legs. Never straddle the limb you
are cutting. Always be aware of the direction the chain will
go if it breaks, and keep people clear of this area. Stand on
the side of the trunk opposite the limb you are cutting.
While
limbing or cutting the trunk (bucking), make sure the chain
does not hit the ground. An operator can cut 40 trees and not
damage the chain the way striking the ground one time can.
BUCKING
(CUTTING THE TRUNK)
If the trunk is
supported along its entire length, overbuck. To overbuck, make
cuts into 1/3 of the diameter of the log from the top down the
length of the trunk. Then roll the log over and make the final
cuts. This procedure prevents pinching the guide bar and chain
(Figure 4).
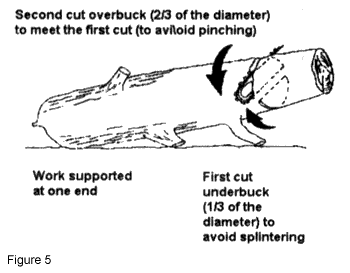
If the
log is supported on one end, make the first cut from the
underside 1/3 the diameter of the log (underbuck). Then
complete the cut from the topside (overbuck) (Figure 5).
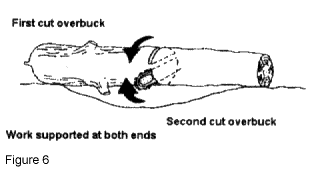
When the
log is supported from both ends, cut 1/3 the diameter from the
top (overbuck) then complete the cut by cutting upward from
the underside (underbuck) to meet the first cut (Figure 6).
Whenever
the saw is being operated, keep people well out of the cutting
area. If a person is assisting by removing limbs, be aware of
your assistant's position and activity at all times.
When
cutting logs with a large diameter, operate the saw with the
throttle about three-quarters open. Overpowering the saw will
waste fuel and create unnecessary wear. Under-powering will
not push enough air through the cooling fins and may cause
engine overheating. A saw buck is a handy device for safely
cutting wood to the proper length. You can find plans in your
owner's manual or at your local library.
ELECTRICALLY POWERED
CHAIN SAW SAFETY
Electrically
powered chain saws require some special safety precautions.
Use only a three-wire cord of the proper size with
three-pronged plugs and a grounded three-wire outlet. A ground
fault interrupter in the power supply line will help prevent
fatal shocks.
The soil
in the work area should be relatively dry. Avoid working in
areas where foliage or the ground is wet.
Lay out
the cord so it will not interfere with your work. Take care to
place it so that you don't inadvertently cut it with the saw
or trip on it.
Make sure
the saw switch is in the "off" position before completing the
electrical connection. Always unplug the power before making
adjustments and when the saw is not in use.
TRANSPORT
AND STORAGE
For transport, set
the saw level with the gas cap up. Be sure the saw cannot tip
over and spill gasoline. Avoid carrying the saw in the
passenger area of a vehicle. Protect yourself and the chain.
Use a chain guard or a carrying case to protect yourself as
well as the chain.
For
storage, drain the fuel tank in a safe area. Run the engine at
idle until it stops to remove the remaining gas from the
engine. Remove the chain and store it in a container of oil.
Disconnect the spark plug wire to reduce the possibility of
accidental starting. Store the saw out of reach of children.
FEATURES
FOR CONVENIENCE AND SAFE USE
Balance.
Saws should not tip to either side or rock back with the guide
bar tilting toward the operator. The saw should feel balanced
and comfortable.
Hand
guard. This is a bar in front of the forward handle that
keeps the left hand from slipping onto the chain.
Chain
brake (Gasoline only). This feature is designed to stop
the chain in a fraction of a second if a kickback occurs, thus
reducing the chances of serious injury. A chain brake can also
serve as hand guard.
Spark
arrester (Gasoline only). A spark arrester keeps sparks
from being ejected by the exhaust. It is required in some
areas of the country.
Safety
tip. A safety tip covers the chain as it passes around the
nose of the guide bar. It reduces the chance of kickback by
keeping the chain from contacting anything at the guide bar
tip.
Trigger or throttle lockout. This feature
guards against inadvertent saw chain motion.
Chain
catcher. A chain catcher helps with electrical safety. If
you choose an electric chain saw, select one that has been UL
listed.
Vibration reduction system. Rubber bushings
between the handle and saw body or on the engine mountings
help reduce the vibration you feel when sawing. This reduces
fatigue.
Bumper
spikes. Most saws have large spikes on the front of the
engine or motor housing that grip the wood and help hold the
saw in place during cutting.
Automatic chain oiling. This feature
automatically oils the chain.
Automatic chain sharpening. This helps keep the
chain sharp while on the job. Manual sharpening should still
be performed every three to four hours of use. Excessive use
causes chain wear.
Compression release (Gasoline only). This makes
starting large engines much easier.
Case
and/or chain sheath. This protects the saw from dirt
during storage and transfer.
Adjustment tool. This is a tool with the proper
wrench sizes for adjusting the chain and removing spark plugs.
| Table 2. Chain saw troubleshooting
guide. |
| Symptom
| Problem
| Correction |
| Difficult or poor cutting |
Chain dull |
Sharpen chain |
|
Improperly sharpened chain |
Check chain |
|
Chain installed backward |
Turn chain around |
|
Improper chain tension |
Correct chain tension |
|
Bar and chain aren't being lubed |
Fill oil tank, adjust oiler |
|
Damaged guide bar |
Inspect guide bar |
|
Exhaust ports dirty |
Clean muffler and exhaust ports |
|
Fuel filter dirty |
Clean fuel filter |
|
Improperly adjusted carburetor |
Adjust carburetor |
| Oiler not working |
Out of oil |
Fill oil tank |
|
Oil hole plugged |
Clean oil supply hole |
|
Oil strainer dirty |
Clean oil strainer |
|
Oiler adjusted incorrectly |
Adjust oiler |
|
Plugged vent on oil tank cap |
Clean vent on oil tank cap |
| Engine won't start |
Improper starting procedure |
Follow correct procedure |
|
Fuel tank empty |
Fill fuel tank |
|
Engine flooded |
Clean spark plug |
|
Carburetor adjustment incorrect |
Adjust carburetor |
|
Spark plug fouled |
Clean or replace plug |
| Engine dies or accelerates poorly |
Fuel tank empty |
Fill fuel tank |
|
Air cleaner dirty |
Clean air cleaner |
|
Spark plug fouled |
Clean or replace plug |
|
Carburetor adjustment incorrect |
Adjust carburetor |
|
Plugged vent on fuel tank cap |
Clean vent on fuel tank
cap |
Disclaimer and
Reproduction Information: Information in NASD does not
represent NIOSH policy. Information included in NASD appears
by permission of the author and/or copyright holder. More
NASD Review:
04/2002
This document
is GO1959
, a series of the University Extension, the University
of Missouri-Columbia, Columbia, MO 65211. Publication date:
October 1993.
David
E. Baker, Department of Agricultural Engineering, and Don Day,
Area Agricultural Engineering Specialist, University of
Missouri-Columbia, Columbia, MO 65211.
|